[dropcap size=small]I[/dropcap]rrigation systems don’t have to break the bank or require professional installation anymore. The Rain Bird 32ETI Automatic Sprinkler System changes the game when it comes to lawn irrigation. On average, sprinkler system installation cost $2,471, with most homeowners spending between $1,862 and $3, 321 (as reported by HomeAdvisor members). The Rain Bird Easy to Install In-Ground Automatic Sprinkler system can be purchased for just $169.00. This Summer we were giving the chance to put the system to the test and let’s just say the grass is greener on the other side!
With the easy to follow installation manual setup was so easy an this reviewer did it himself. In this review we will take a look at what’s in the box, set-up, installation and overall performance of the Rain Bird Easy To Install Automatic Sprinkler System. Here we go…
 Specifications:

- Maximum spray distance: 32 ft
- Maxium coverage area: 3000 sq ft (depends on sprinkler placement and water pressure/flow
- Recommended water pressure: 40-75 psi
- Minimum water flow:6 gallons per minute (GPM)
- Sprinkler type: pop-up gear drive rotor
- Sprinkler throw distance (adjustable): 16′ – 24′
- Sprinkler coverage patterns (adjustable): 40° to 360°
- Sprinkler location: below ground
What’s in the box:
- (6) Rain Bird professional grade ½” inlet adjustable rotary sprinklers
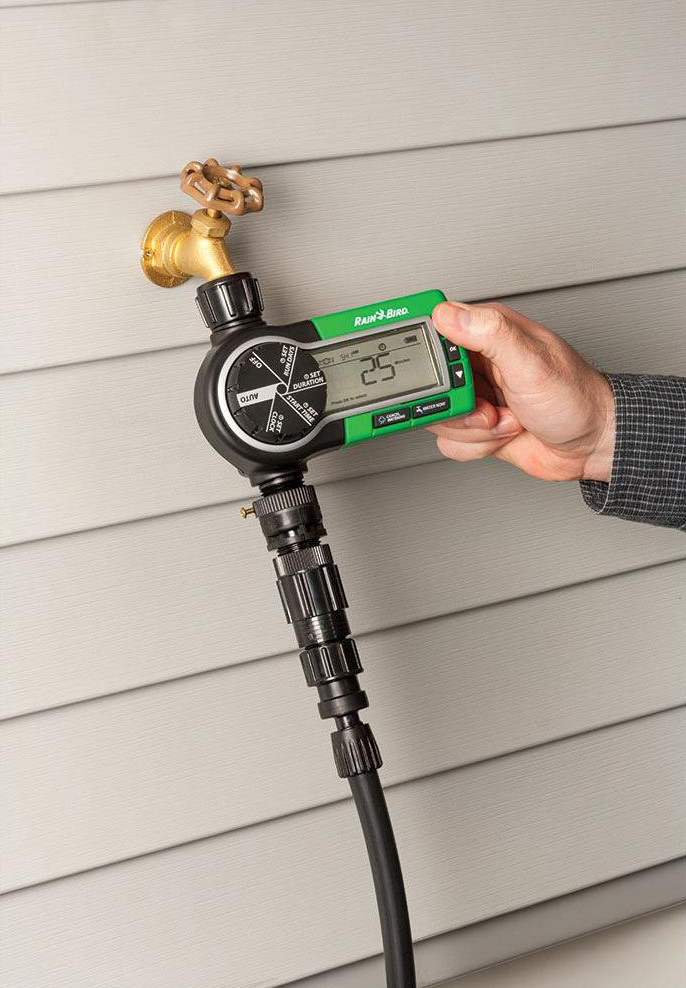
- (1) Rain Bird 1ZEHTMR Automatic Watering Timer
- 125’ coil of distribution tubing
- (6) threaded male tee fittings
- (2) ½” barbed tee fittings
- (1) ½” barbed coupling
- (2) ½” barbed elbows
- Barbed fitting insertion tool
- Faucet connection kit
- Drain valve components (2 automatic drain valves, 2 compression couplings, 2 drain valve adapters)
- (6) stakes and cable ties

- Roll of PTFE tape
- Rotor adjustment tool/screwdriver
- (1) ½” male-female elbow fitting
- (1) adapter, ½” male pipe thread to ½” tubing
- (12) additional sprinkler nozzles (1.0 GPM and 1.5 GPM)
Tools not included but needed:
- Flat blade shovel or half moon edger
- Measuring tape
- Garden shear or tubing cutter
- 2 AA batteries
- 5 gallon bucket
[divider]Rain Bird Easy To Install Automatic Sprinkler System Breakdown[/divider]
Setup:
First things first we had to find out about any buried utilities in our yard, call 811 at least 24 hours in advance before you start to dig. Once the federally mandated issue was out of the way we could find out our water flow rate. Rain Bird lays it out clear as day to figure out the GPM in the easy to follow instruction book. Goes a little something like this; put 5 gallon bucket under faucet, turn on, time how long it takes to fill. Now math; 5 gallons divided by how long it took to fill, multiply by 60 and boom, you have your GPM. Using the table provided, we then knew the sprinkler throw distance and approximate coverage area to begin plotting our layout. Provided in the instruction manual are some sample drawings and a spot to sketch and stake your layout (trust us, this makes life easier).
 Installation:
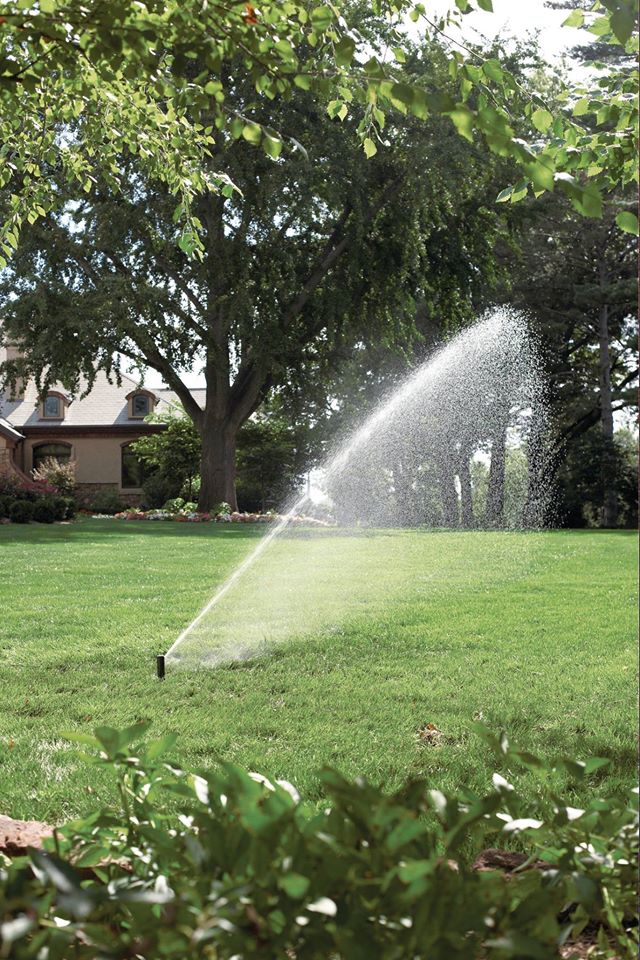
Utilizing the provided sketch/layout patterns, installation was actually a breeze. Great tip in the manual and we will repeat, let the tubing warm in sun before use, this makes it much more pliable. We proceeded to measure out and use the provided stakes to mark out our sprinkler locations. Cutting and connecting the hoses went off without a hitch, with the provided barbed fitting insertion tool securing a tight fit around elbow, tee fittings, and sprinkler heads was a sure thing. We were then going to bury everything but learning from our mistakes and now following the instructions closely we tested the system by using the provided cable ties and stakes. With a few minor tweaks using the provided rotor adjustment tool (screwdriver in case of misplacement) we were able to ensure we had full coverage of the lawn. By chance, we did the instillation a day after it had rained, we would suggest doing this or at least watering down your lawn, this made it much easier to bury the tubing and finish the job.
Performance:
Considering how easily it came together and the price tag being so much less then other irrigation systems, we have to admit we had our doubts. A couple months later, like we said before, the grass is greener on the other side! The automatic timer can be set to run multiple times per day, only on certain days, manually turned on and even has a one press cancel water button when needed. No, it doesn’t have a rain sensor, but let’s remember the amazing price tag… We have had a dry summer and our backyard has never looked so good. Combine that with not having to drag a hose around yard multiple times per day, the Rain Bird Easy To Install Automatic Sprinkler System has been nothing short of amazing.
To touch on the winterization side of things, which we hopefully have a lot of time left yet, the system itself shouldn’t need anything if the drain vales were placed properly, which we think we did. Only the timer needs to be disconnected and stored indoors. Update on that will come in the spring!

Value:
The value of the Rain Bird system is possibly it’s highest quality. When you consider the cost is less than a financed monthly payment would be for a professional installed system, it’s a no brainer. Rain Bird now offers a greener and more beautiful lawn to homeowners on a budget.
Buy Now: $169 or to learn more, go to: RainBird.com
- Price!
- Easy Install
- Winterization not needed
- Rain sensor
- Only suitable for up to 3,000 sq ft
The problem is the timer internal plastic manifold breaks after a summer of diurnal thermal cycles: leaking water and ultimately shorting out the solenoid. Classic case of great overall design followed by poor design or manufacturing of simple components; leading to system failure to meet objectives i.e. last more than 1 year without expensive maintenance. Maybe the fact that Rainbird to not provide any warranty would be a hint of this system failure to come.
Any news on the effect of freezing on the pipes?
We use an air compressor to blow out lines in fall and no leaks yet…
Hi Dan,
What compressor do you use and what setting on the compressor? I have read that if you don’t set it correctly you can blow the sprinkler head, … Do I need to hire a professional to winterize or can the compressor work be done as DIY?
Thanks.
-Chandy